Pages

Saturday, December 22, 2012

Christmas House


I am REALLY starting to love to paint!  For the most part it's still hit or miss, but I was pleased with "Our Christmas Home", that really doesn't look like our home at all!

This time I actually did photograph a step by step, but...I accidentally deleted the first ones.  I was so sick.  Anyway, I'll upload the ones I managed to keep and show you how the painting evolved and changed along the way.

At this point, I hadn't added the foreground trees yet, but I had begun placement (notice the long blue line).  The side walk is massive, too.  MUCH tweaking yet to be done!
TREES! and way too much yellow reflection.  Still did not know what to do with the snow on the roof at this time or what to do with the massive sidewalk!...OR the shading on the roof...or the snow in the foreground.  I hadn't painted my bows on the wreaths yet. It was a mess.  I didn't like the trees behind the house.  I felt they were too much.  At this point, I didn't have much hope for the painting.


Beginning to feel much better!  I brightened up the moon.  I toned down the shading on the roof.  I removed the trees over the top of the house.  I made the sidewalk MUCH smaller.  I added more snow to the foreground and blended away some of the yellow.


Finally.  I added back some of the shading I had on the roof.  I added more shaking to the house.  I made the tree limbs around the moon longer.  I hung icicles off the roof.

I know next year I will see all sorts of improvement I need to make, but for now, our Christmas Home is a "happy little painting!"

Sunday, November 11, 2012

Painting Gourds


Well, another fail in that I forgot to take pictures in the making of these little fellows!


I did take this one which shows I first spray painted them in white, then went over them in red.  I obviously painted the faces on the white part, using a flesh tinted paint color for the face.  Everything else is pretty much self explanatory, except for the hair.  If you do decide to paint Santa's or anything else with hair, a must have is a "rake brush".  For Santa, you base coat your beard and hair a grey color, then dilute white paint and slightly go over the grey with an almost white wash.  The rake brush really gives the appearance of hair!


While I don't have any step by step instructions, I would add that if you want to add texture to the "fur" of a Santa hat, or add snow to an art object, Snow-Tex is an awesome and easy to use product!


Making Candles!

As a maker of soap and lotion, I knew I wanted to make candles when I saw pins on Pinterest.  This was my first attempt.
I bought some soy flakes off ebay.  Big mistake.  The soy was good, Golden brands 464, but the transaction...not so good.  Anyway...

First I hot glued the wicks (make sure you get the right size for the opening of your jar) into the bottom of my jars.


Then, I melted the wax in an old rice cooker.  It worked great!  BUT, you must watch it and make sure you remove it from the heat source as soon as it gets to about 180 degrees. Use a thermometer.  Can't stress that enough!

Then, I make my mistake.


I used a water based colorant to color the wax, FIGURING that if it worked with soap and lotion (oil based) it should work with candles.  Nope.  Left little clumps of colorant that I had to strain with cheese cloth.  No pictures of this little mistake as it took two hands to fix my mess.  You'll see my boo boo, as in flakes in my candle, in a picture to come.

I found a great place for supplies and oil based colorant, Candles and Supplies


The Family Table


A few months back, I got it into my head to make a "Family Table".  My kid's are getting older, and some of our best and fondest memories have occurred around the Family Dinner table.  I didn't realize how "sentimental" it would become, until my husband, Eric, took a job requiring him to travel.  Now, when we sit down for our evening meal, he's still with us!  Sort of...!

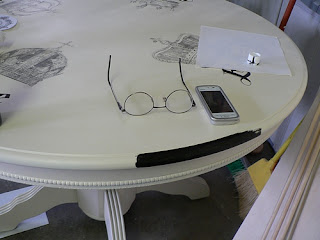
What I forgot to do was to take a picture of the table and chair. Anyway, I bought a black one at a yard sale for $30!

My husband, who is the "World Finest Spray Painter" (no exaggeration) was who I enlisted to paint the table.  He has painted numerous items and the man NEVER has his paint to run.  I bow to the master.

I knew I wanted to use different "Crowns" that were available from The Graphics Fairy.

We each chose different "Crowns" from her website.  I then typed each name of our family and placed them under our chosen "Crowns".  After, I printed them off on the laser printer and transferred them to the table using the Citrasolv Method.


I liked how the crowns looked, but I felt the names needed to be "crisper".  So, I went over the names with Sharpies, hoping the sealer wouldn't smear!


I then decided the table would look better if I painted the lip of the table in dark black acrylic paint.


IMPORTANT POINT!!!

I forgot to add that I sealed the table using 5 (yes 5) coats of Minwax Polycrylic.  After 5 coats I was still concerned if the water based finish would be strong enough.  So, on went two coats of Polyurethane!  It has already turned yellow.  (I had a caddy in the center and you can see the outline).  I removed the caddy, and it seems to be fading, but I'm afraid we will eventually have a yellow top table!


Wednesday, August 29, 2012

Painting Class...gulp!


Recently I took a painting class at Jerry's Artarama in Nashville, TN.  The artist was Frank Baggett, a Middle Tennessee Artist.  I was so scared to paint this picture as I am what I would call a "painting piddler."  I can tole paint until the cows come home, but it was a challenge for me to paint a picture from a real picture.  I would have done a step by step of this painting, but it changed and changed and changed!  The main thing I would say is BELIEVE IN YOURSELF.  Even if your confidence isn't what it should be, "do it anyway".  You'll never know what you can do until you try!

Thursday, July 26, 2012

How to make Super Moisturizing Lotion


A few years ago, I was taught by a very wise woman how to make homemade soaps, lotions and body products.  Since learning these techniques, I rarely buy store bought lotion or soap.  You can "personalize" the scent of any bar of soap or lotion by buying from a distributor the "fragrance oil" that you love.  In Nashville, we have a place called Hunnee B's that sells some of the highest quality oils I've found.  If you don't live near Nashville, you can order online.

CAUTION:  This lotion is very, very oily.  It makes your skin feel marvelous, but if you want it to have a less greasy feel, increase your Emulsifying Wax by 3-4% or add a teaspoon of cornstarch to your water mixture.  Also, leave out the glycerin.

Let's get started!!!

You make Lotion in 3 phases:  1. Water phase; 2. Oil phase; 3. fragrance/preservative phase.  Below is the recipe I used to make the lotion pictured above.


Whipped Lotion Recipe:

WATER PHASE
620 grams Distilled Water
 40 grams liquid Glycerin  (drug store)

OIL PHASE
100 grams Shea Butter (Hobby Lobby, ebay, online)
100 grams Cocoa Butter (Hobby Lobby, ebay, online)
160 grams Coconut Oil (Walmart, baking section)
 20 grams Stearic Acid (Hobby Lobby, ebay, online)
 60 grams Emulsifying Wax (Hobby Lobby, ebay, online)

FRAGRANCE PHASE
7 grams Phenonip
16 grams favorite fragrance oil (or more...depends on how strong you like it)

You will also need:
Kitchen Scale that can measure in ounces and grams
Metal pan for heating oil
Plastic container for heating water
Jars for lotion
Alcohol 

1.  The first thing you do is get a spray bottle of alcohol and wipe down all the containers and work surfaces you will use in this process.  It seems that lotion that is heated in the making can contaminate very easily, and you want to keep a sterile workplace.  Sterilize your jars and tops, too.  I was told to use gloves, but I just spray my hands with alcohol and go.

2.  Measure your ingredients!  Make sure your scale is set to grams!!!  ALSO, make sure you set your plate/bowl on top of the scale before you turn on your scale.  If you don't you will be subtracting the weight of the bowl/plate and that's not good!


After you've measured ALL ingredients for all THREE phases, set them aside. 

(1) Begin by heating the water/glycerin in microwave until barely warm.  Set aside. (Sorry, forgot picture of water phase!)

(2) Melt the oils in a sturdy pot at very low heat.  You want the oils to be completely melted, but that is all.  Many people measure the temperature, but I have found that if you remove the oil from the heat source once the last piece of oil/butter is melted, you're good.


(3) After the last piece of "Oil Phase" material is melted, remove the pot from the burner.  Let set a few moments and add the WATER PHASE to the OIL PHASE.
Water added to the melted oil/butter  


(4) Take out your hand mixer with the beater bars sprayed with alcohol and go to town!


(5)  Whip the mixture for 3-5 minute intervals.  Stop and give your mixer and the lotion, 5 minute "rest periods". 

(6)  If you want to speed up the thickening process, you can put your pot of almost lotion in an "ice bath".


(7) Add "Phase 3"-- fragrance and preservative.  Ummm...smells like heaven!
(8) Pour or scoop into jars of your choice.

NOTE:  As stated earlier, this recipe came out VERY greasy.  This tutorial is basically to show you how to make lotion.  This lotion is great as a foot lotion, OR for those you don't mind that "greasy" feel to their moisturizer.  It is also a GREAT night time face moisturizer...if you leave out the fragrance oil.

How to use Armour Etch


This past weekend I went to a friend's wedding.  She had ordered some personalized, fluted wine glasses but wasn't pleased with the way they turned out.  THEN, she asked me if I would make some for her.  I was intimidated, but jumped right in!

Here are the steps to ETCHING GLASS easily at home:

1.  CREATE YOUR STENCIL.  In this case I used my Silhouette and cut out my design; then "weeded" the vinyl.  (See below.)


2.  USE TRANSFER TAPE AND ATTACH TO GLASS.  After I had "weeded" the vinyl, I strongly rubbed my transfer tape over my design.  Then I cut out the vinyl/transfer tape and attached it to the glass.  After it was SECURELY burnished down to the CLEANED glass, I REMOVED the transfer tape.  That left the area that said "Sharon & Joe" exposing the glass.  THEN I put on ARMOUR ETCH pretty thick.

IMPORTANT:  You really want to make sure the vinyl is firmly attached to the glass.  Watch closely for bubbles OR loose vinyl.  If there's ANY gap between the vinyl and the area to be etched, the etching cream will seep under and ruin your masterpiece!


3.  WAIT...then RINSE.  The etching occurs pretty fast.  I leave it on for approximately 5 minutes, then you rinse off the etching cream.  I use hot water because it softens the vinyl for easy removal.  It especially makes it easy to remove the small vinyl pieces like inside the "a" and "o".
4.  Enjoy your efforts!


Saturday, July 14, 2012

How to Sew a Pillow AND do a Citrasolv Transfer


A friend of mine recently asked if I would make a pillow as a wedding gift for a friend of hers.  I went to an excellent site for beautiful personalized downloads, weddingchicks.com.  I found a gorgeous monogram that can be used in a variety of ways.  Here's the link: http://www.weddingchicks.com/freebies/custom-monograms/formal-crest/  After opening the file in my graphics program, I mirror imaged the design, then printed it out on my laser printer.
After I cut out my fabric, I chose 18"X18", I ironed the fabric to get out as many wrinkles as possible for a smooth transfer.
It's kind of hard to tell, but under the white paper, you can kind of see the image of something underneath the fabric.  I placed a magazine under the fabric and the transfer image to help prevent the Citrasolv from seeping out.  I also taped my image, FACE DOWN in the center of my fabric.  Now for the fun!

You apply the Citrasolv, in sections with a cotton ball.  If you use too much Citrasolv it will smear,  too little and you will be applying more.  It's all trial and error.  After I let the Citrasolv set for a few minutes, I took the end of a butter knife and really rubbed the paper to press the ink into the fabric.  I checked to see my progress below.
After rubbing and rubbing, I ended up with a fairly good transfer.  (See below)
Now for the part that I'm not too good at...the sewing.

First, you take the front and the back pieces of fabric that will be your pillow. THEN, you take pins and pin the two pieces together by pinning around the edges of your image. 
You will most likely have some surplus fabric around the edges (see below).  I'm sure a really good seamstress will not, but I always do.
Then you take a ruler and try to center your image as best as possible.  You then cut off the excess and hope for the best!


Next, you turn your fabric inside out and begin sewing!!! 
I didn't take any actual sewing pictures, but I left approximately a 1/4 (plus) inch margin all around the edges.  I left a three inch gap on the end, (supposed to be in the middle) to "inside out" the pillow.
After you "inside out" the pillow...
Take the pillow back to the ironing board and run the iron down the newly sewn seam.
Now, STUFF the stuffin' out of it!
And there you have it!